Saturday, July 27, 2013

Cutting a Motorcycle Windshield

As Margaret has gotten more comfortable on her bike she has had an ever growing issue with the windshield.  She's getting a lot of reflections and glare on the inside that is affecting her ability to see the road due to its height. Everyone has their preferences on how tall, short, fat, etc. a windshield should be. Most articles, riders, and accessory places will recommend that your eye site should be just above the top of the wind shield.  I tend to agree with this.  Try having a windshield that you have to look through and ride in the rain.  No wipers means you can’t see through it and you’ll end up having to crane your neck to the side of the windshield to see the road.

We finally decided something had to be done for her.  We could take it somewhere and have a company cut it for us or try it ourselves.  HA! Let's do this! No Fear!  We Ain't Skeerd! The worst situation that could come from this is we could mess it up and have to buy a new windshield.  It’s not like we would mess up the bike from improper procedures on this task.

We started by having her sit on the bike in riding position. As corny as this sounds I took a builders level and stuck it close to her eye until the bubble showed level and marked that spot on the windshield.  Naturally she whined that I stuck it in her eye, blah blah whatever dear. This gave us a good visual reference as to where her eyesight came into contact on the windshield.  Then we measured down 1” from that spot for our cut point.  This point was exactly 2.5” from the top of the windshield.  I measured 2.5” from the top center around towards both sides and made a lot of pinpoint marks as I went.  When you get to a certain point towards each side you have to begin to taper your measurement to merge your cut line with the side of the windshield.  This way it won’t look like you just chopped off the top.

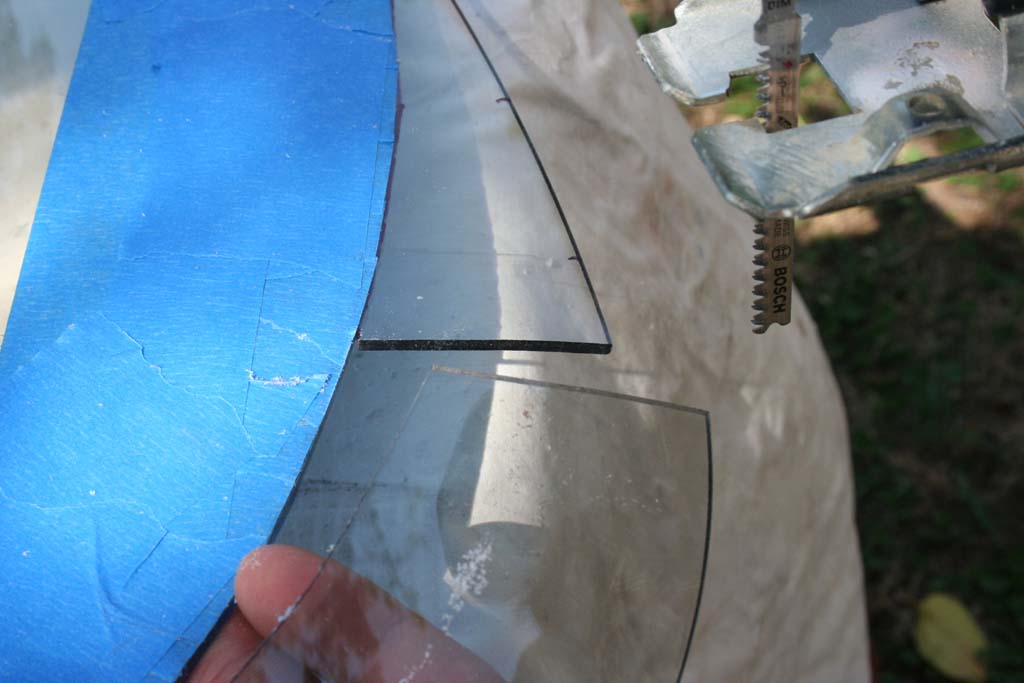
Next I connected all the dots I made using a permanent marker.  I did this freehand but had made enough dots to where it came out nicely rounded.  Now I took painters tape and ran it on the lower portion of the windshield along the marker line.  This helps prevent chipping if the jigsaw blade catches too much.  I made sure to put a couple inches of tape to prevent the jigsaw base from scratching the plastic while moving it along while cutting.


For the cut I purchased a Bosch Plexiglass blade pack at Home Depot for $8.95.  This was our only expense on the project since I had everything else necessary.


I started at the blend point on one side of the windshield so I could make one continuous cut most of the way around without having to stop and reposition the blade.  I didn't push very hard or force the blade to cut.  Just hold the jigsaw firmly and let the blade do the work.  I also held the windshield very firmly and close to the front of the cutting blade to eliminate any jumping that could happen from snagging.  If the blade snags it could cause the plastic to chip in that spot.  Snagging will usually occur from a dull blade, pushing it along to fast trying to force the blade to cut faster than it is able, or a blade that is not fine toothed enough to cut the material.  Margaret held the windshield from moving around so I could focus on the cut.  Just follow the tape line around and try to keep it as smooth as possible.  You might not get an absolute perfectly rounded cut but you’ll be sanding any points or other imperfections afterwards.

When you get about ¾ of the way around you'll want to stop cutting.  Your gonna want to cut the big rounded piece you've been working on off.  The reason for this is to prevent the plastic you've already cut from snapping off due to the weight which could cause damage to the windshield.  After you do this continue your cut on the remaining small piece until your done.


Now I took off the tape to get a better view of the cut and began sanding the edge with 100 grit sandpaper using an electric sander.  I used the 100 grit to smooth any areas that might not have been rounded well or any points that I needed to blend.  When I was happy with the shape I moved to 400 grit and used this one to begin rounding the edges to match the original cut.  I finalized the sanding with 600 grit without using the electric sander.  Doing this allows you to feel any rough spots with your hand that you might need to go back to using a courser sandpaper. 

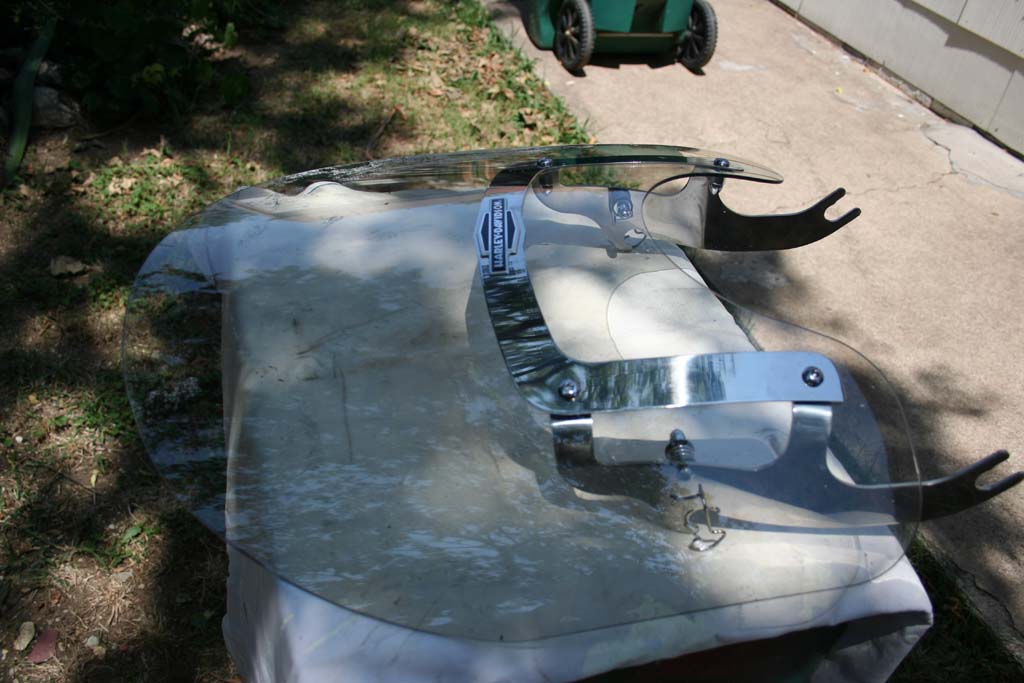
 Before sanding the edge


Closeup before sanding


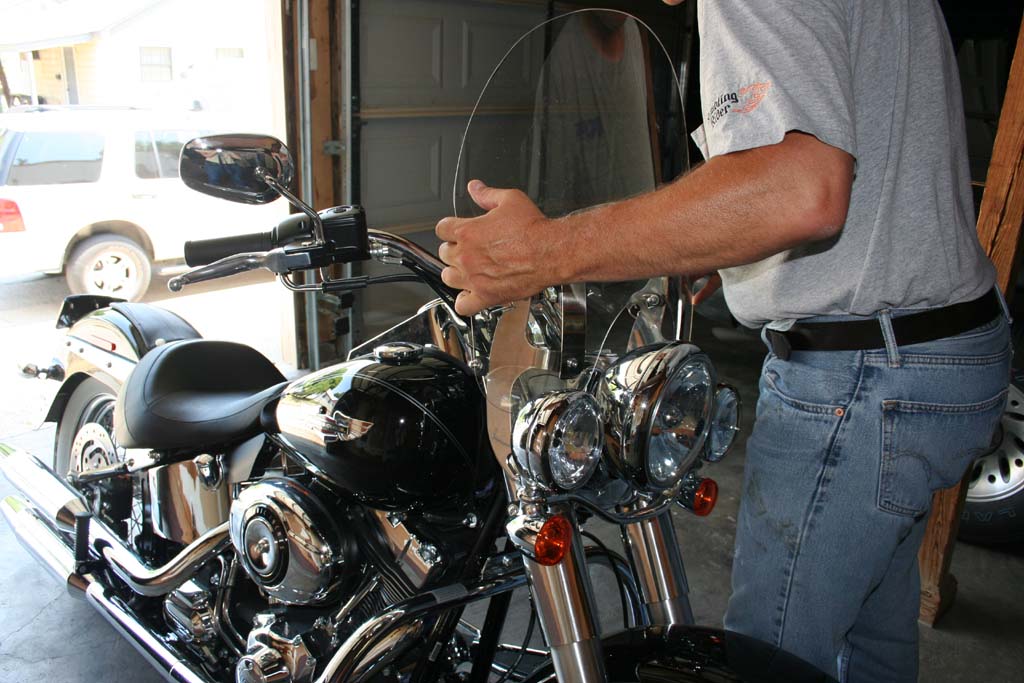
I tried to get another closeup of how well the edge looks upon completion.


And thats it!  The whole job took about 2 hours and came out well.  She's ridden with the shorter wind shield 3 times and is very happy with the results.


Saturday, July 20, 2013

Air Filter Cleaning

Another very important maintenance procedure is to clean and lubricate your air intake filter.  When that thing gets dirty your bike will start running rough due to not getting enough air into the cylinders.  Its an easy procedure that anyone can do with basic tools.  If you have been doing your own oil changes you'll  already have all the tools necessary to do this.  The owners manual that comes with your bike shows this needs to be done every 5000 miles.  I clean mine with every oil change and that puts both maintenance procedures on the same schedule.

If you have the stock filter that came with the bike when you bought it, you can only perform this about 1 time before the filter falls apart.  I bought a K&N stock air filter replacement at 5000 miles.  K&N has a million mile guarantee on the life of the filter.  The cost of the K&N at the dealership was $88.95.  Not bad considering the stock replacement that can only be cleaned once is $60. 

The only tools you're going to need for this is a Phillips screwdriver and a Torx T-27 wrench/socket.  Aside from purchasing the filter which I highly recommend you will also need to purchase a K&N Recharger Air Filter Cleaning Kit .  You can get a small kit for $12.95 at the dealership or here: K&N Air Filters & Cleaning Kits which will do a LOT of cleanings.

Enough chatter on my part, lets get going!  First remove the air filter cover.


Now remove the filter using the Torx T-27 wrench.  Once you get all 3 bolts loose they will come off with a large bracket that holds the filter in place.


Now your left with the housing.  There will be some oil all around this area which needs to be cleaned.  A small amount is normal due to blow back.  A good thing to know is if you overfill your crankcase when doing an oil change you will get excessive blow back and your filter will clog from the oil causing your bike to run rough.  I use a shop towel and wipe all of the oil off.  Clean all over including into the butterfly valve.


Inspect the gasket on the back of the filter.  You can see mine is worn pretty badly.  I had to make a trip to Harley to pick up a new one.


Now your going to use the cleaner that came with your K&N Air Filters & Cleaning Kit.  Spray the cleaner all over the filter both inside and outside fully coating the mesh material.  Let that sit for about 10 minutes to give it time to break down oil and particles that are in the filter.  Don't let it dry though.


Once you've waited about 10 minutes rinse it with cool water.  Start from the inside of the filter until you can see that the majority of particles and oil is gone.  The filter should start looking white in color when its clean.  After washing from the inside I finish it off with a good blast around the outside too.  This way I can flush out any oil or particles still inside the filter and between the fins.  If the filter was really dirty you can spray the cleaner again and repeat the process using soapy water in a sink.  Just be sure to rinse it well.  If you have chunks of stuff like I had in the picture below you can easily dig them out with a pointed object.  Just be careful not to puncture the filter.  Somehow I got a rock wedged in mine.  Often you'll find grass still stuck in there that you'll need to carefully dig out.  Once your done with this part let it dry.  This is critical and it warns you in the instructions from K&N to be sure the filter is FULLY dry before applying the oil.


I take the time to clean the air filter cover while its drying.


It was 100 degrees outside when I did this cleaning and took pictures so the filter dried completely within an hour.  Now you use the air filter oil that comes in the kit.  Hold it about 3 inches from the filter when you spray it.  Your only going to want to coat the filter until it lightly covers it and turns the white part red.  If you kind of use it like a paint spray can and use short moving strokes you can get down inside the folds well without over oiling the filter.  Work you're way all around the outside.  Some of it will get on the metal housing and you'll want to wipe that off when your done so as to leave only the actual filter part oiled.  Some people have asked why we have to oil the filter.  The reason is the oil will keep the filter fibers from being too porous and will help to keep small particles like dust from entering into the intake.  Particles will stick to the oil instead of being sucked through.  The oil also repels moisture so if any moisture gets into the filter housing the oil barrier will keep it from getting into the intake.


Install the new seal on the back of the filter and reassemble.  There are 2 vacuum tubes that you will want to be careful to insert into the back of the filter when putting it back on as well.  Just reach behind the filter and stick them into holes in the back of the filter.  They don't fasten or secure in anyway, they just stick in the back.

That's all there is to it!  So how much are you saving doing this?  Well, at 18K miles I had to take my bike in for another oil leak.  The work to fix the leak was covered under the warranty which was nice.  While they had it in the shop they called and said my air filter was dirty and would I like them to clean it while they had it in.  I said sure since cleaning time was coming up soon.  I didn't realize that work was considered "maintenance" and not covered under the warranty. I didn't complain, they did the work and I agreed to it without asking about charges.  They charged $54 to clean that filter.  So consider every time you take that bike in and have them clean the air filter they are going to charge you $54.  They might roll that price into whatever other maintenance your paying them to do but that's the price their gonna pass on to you.
Lets break this down:

K&N Motorcycle Filters= 88.95 (Dealership price)
K&N Air Filters & Cleaning Kit= 12.95 (Dealership price)
Your Cost= 101.90

Since your supposed to clean the air filter every 5000 miles you will pay this back starting after your 2nd cleaning at 10K miles if your paying the dealership to do it.  You will also have the piece of mind that its being done thoroughly and correctly by doing it yourself, and once again, your getting to know a little more about your bike.


Saturday, July 13, 2013

Steering Head Bearing Lubrication

This VERY simple maintenance tip can be performed by anyone and with only one tool!  That is exciting news for anyone.  Your steering head bearings should be lubricated at regular intervals that are outlined in your owner’s manual.  This will keep your steering bearings from binding which could cause control issues. My Street Glide is every 10K miles, Margarets Softail Deluxe is also 10K miles.  The first lube is supposed to be performed at that critical 1K miles service. What your owner’s manual does not explain is how to lubricate, how much lubrication to use, and what type of lubrication to use.  This information can be found in a service manual for your specific bike.

When your bike initially gets shipped to the dealership and assembled the steering head bearings are already packed (lubricated).  The factory packs the bearings before they install them into the steering head.  So off you go into the wild blue yonder and 10K miles later it’s time to lube them up.  Fortunately this does not require any disassembly as some older bikes may require.  Harley has been kind enough to install a grease fitting into the steering head of their bikes.  If yours doesn't have one, then your outta luck and this post is not for you.

The only tool you’re going to need for this simple maintenance procedure is a 14oz grease gun.  You can purchase one at Northern Tools for $19.99.  They sell a couple of higher priced ones but unless you’re gonna run around squirting grease all over the place every day you’ll be wasting your money on those. You won’t need any special adapters or extenders, the basic grease gun right out of the box works just fine.  That’s it for tools!  You’re still gonna need to get grease though.  Easy enough!  Head out to your local dealership to the parts counter and tell them what you’re doing.  Harley has a special purpose grease that is formulated for higher temperatures before it liquefies. Using this grease is important because if you just pick up some bearing grease at Autozone the breakdown temperature may not be as high and if it’s hot outside and/or you’re doing a lot of maneuvers (skills day, competition, etc.) the grease could literally seep out of the bottom of the steering head and begin to leave the bearings without lubrication.  It’s not expensive at the dealership and it’s approved by Harley for this purpose.

Load the grease into your gun according to the grease gun instructions and get ready to squirt!  With your bike on its jiffy stand, turn the handle bars fully to the right side to expose the grease fitting.  THIS PART IS IMPORTANT- Be sure to get someone on the right side of the bike to hold it.  The bikes center of gravity has now been changed and it could tip over on the right side if too much of a push is applied from the left side.  Push the grease gun head onto the grease fitting making sure it’s on securely. This push is why you want someone on the other side of the bike to keep it from tipping over.  Once you've got the grease gun attached start pumping with smooth, even, full pumps with the lever.  If a lot of grease is coming out from the fitting then you haven’t gotten the gun on correctly.  A little will come out but it shouldn't be excessive.  When your bike is assembled, even though Harley packs the bearings, they do not fill the steering head with grease.  Now for the first time the steering head is getting filled.  You’re going to use almost half of that tube of grease the first time you do this if it hasn't been done before. Just keep squirting grease in there until it begins to come out of the top and bottom of the steering head.  This is done in accordance to the Harley Davidson service manual.  When the grease begins to ease out you know the bearings have been lubricated since the grease has to go through the bearings before it will come out of the top and bottom of the steering head.

All of that write up for a simple task.  I wanted to be detailed though!  Now you can clean up the grease around the fitting and steering head and give your bike a nice soapy bath to show it how much you appreciate it.

I don’t know about cost savings on this one.  I do know that by doing this myself those bearings are greased at the correct intervals and greased fully.  I'm not trying to bash or discredit anyone but I do want to mention that I took my bike in to the dealership at 1K miles to get the initial service performed.  They did not lube the steering head bearings as they were supposed to according to the service manual.  I only knew this because of the amount of grease I had to use when I did it myself.  It’s also nice to be able to take 10 minutes and get it done at home instead of taking the bike to the shop, dropping it off, waiting, or picking it up later.

Here is the cost breakdown:
Grease Gun- Northern Tools: $19.95
Grease: $9.95
Total Cost: $29.90


This is the special purpose grease that you can buy at Harley.


A closeup of the grease.  This kind of shows the thickness of it.


This is the Service Manual (not owners manual) that shows the process.


Grease fitting on the steering head.


This picture shows the grease squirting out from the bottom of the steering head.


This picture shows the grease squirting out from the top of the steering head.


Sunday, July 7, 2013

Margarets First Road Ride

Last weekend Margaret completed the state mandated riding class and obtained her license.  She did quite well by having the overall highest scores of the class.  Congrats on that!  Being an extended weekend due to 4th of July, we were able to get her out in the parking lot a bit more than usual so she could get more comfortable on her Harley.  She gained so much confidence that she asked if we could take a short ride on the road Sunday morning.

We left very early in the morning knowing there wouldnt be many cars on the road.  We stopped at the McDonalds in Crowley and had some coffee and talked about how she felt about the ride before heading back.  She was a bit nervous and it showed but that is to be expected.  On the ride home she did much better.  You could see she was more relaxed and her riding reflected it. Total round trip was 16.8 miles.  That was enough for her first time out.  This gave her the opportunity to apply her riding abilities to the road and experience a taste of what is to be expected on the road. I was very happy with her riding and comfortable with her as a riding partner.  I was never nervous or worried about her riding or feared that she was a danger to herself, me, or others on the road.  Her basic riding skills were well developed and she handled the bike on the road just fine. Refined skills will come with practice and repetition.


Thursday, July 4, 2013

Million Mile Monday 2013

Every year Harley Davidson does a Million Mile Monday. Launched in 2008, Million Mile Monday has been an annual event on the last Monday of June that brings thousands of Harley-Davidson motorcycle riders together in a collective effort to celebrate the motorcycle riding experience.  Outside of having an excuse to take off work on this Monday and ride, nothing really comes from it.  Fort Worth Harley Davidson has taken a step to incorporate this ride into part of their year long charity fund raising event.

For every mile that is ridden and logged by Fort Worth HOG members, our sponsoring dealership gives one penny to a local charity.  This may not seem like a lot but when you compile all of the members miles over the course of a year it begins to add up.  The miles don't even have to be chapter event related.  Just riding to work and back will count towards the charity donation at the end of the year.  Over the last two years, Fort Worth HOG members rode over 2 million miles collectively each year, and for 2 consecutive years.  We are the only chapter in the United States to have done this 2 years in a row. The dealership donated over 20 thousand dollars both years to a local charity.  We are hoping to accomplish 2 million + miles again this year.  Originally it started out as the Million Mile Challenge, now it has evolved into the 2 Million Mile Challenge for our chapter.

The end of June closes out and begins the miles accumulation.  On Monday June 24 a nice sized group of riders from our chapter formed to put some miles in for a final push to reach the 2 million mile mark.  Being a Monday most riders had to work, but some of us took the day off to ride.  Others that are retired took advantage of the gathering to get another group ride in.

Monday started out at a nice 74 degrees but soon peaked at 95 degrees.  We left the dealership at 9:30am and headed for the Glen Rose, TX area.  Fort Worth Harley surprised everyone by buying our lunch in Glen Rose for which I am personally very appreciative.  We arrived back at the dealership and recorded our miles at 2:30pm.  It was a fantastic ride, 18 bikes were involved and we rode 167 miles.

Million Mile Monday