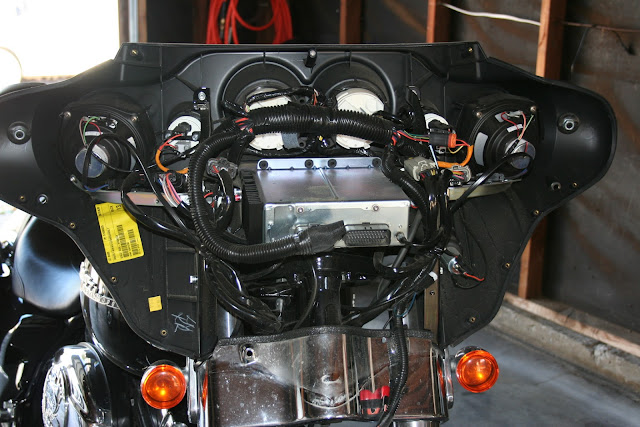
Due to weather, personal things, and groups not doing much, I haven't done any riding since the last post. However, last month I purchased passing lamps for my bike and we took a few pictures of the installation process! I saved this post information for a time of inactivity and here it is!
The lamps and the brackets I wanted were right at $400.00 at Harley. We had planned on getting these at the right moment and that moment was now. Last year at our chapters picnic Margaret and I did very well in the bike games placing in 3 of the 5 events. The prizes were gift cards to the dealership. I had saved those along with some gift cards we had won at other chapter events so with the gift cards I only had to spend $150.00 for them out of my own pocket.
I knew there was going to be quite a bit of work involved to install them. What better way to learn a bit more about your bike than to do something you know is gonna be extensive!
The instructions provided were minimal and lacked detail. It wasn't all that hard to figure out though. The only problem I ran into was where to get power for the lamps. That small detail is not noted anywhere in the basic instructions provided. I had to go to the dealership and ask Jake for that info. He was great about it and told me it was the grey wire from each of the turn signals that is not used from the factory. Harley put that power there specifically for passing lamps to be installed later.
1) Remove windshield
2) Remove front of fairing. After removing the Torx screws remove the headlight connector.
3) Remove ignition switch. You have to remove this to get the switch control panel off.
4) Remove switch control panel.
5) Install switch into a blank area of control panel
6) Wire switch power feed both in and out and ground into the harness according to diagram. The picture below is the back of the harness which points towards the switch controls. You have to stick the new switch wires into the specifically labeled holes to route power to the lights. I purchased the independent lighting control harness as well. That way you can have your brights on at the same time as your passing lamps. That was the easy part of the install, disconnect the wiring harness from the switch panel and snap the short harness in between. It is clean, sealed, and makes the necessary cross connectsso you don't have to cut and solder wires.
7) Reassemble switch control and ignition switch.
8) Assemble lamps and brackets
9) Remove existing turn signals because you will use your existing housings. This is where it started getting a bit tricky. Your supposed to feed the turn signal wires through the new mounting bracket along with the power wire for the passing lamps. First you have to cut the connector off of the turn signal wires. You will have to make a new one with the provided component's later. The problem is that the turn signal lamp wires have been sealed in a plastic material that adheres to them. You cannot just simply pull that sheath off to expose the wires and with the sheath on it is too big to fit through the bracket hole with the passing lamp power. And its not just a hole, its a 6 inch long little hole you've got to push all the wires through. I had to take a utility knife and very carefully slice the sheath off the turn signal wires without cutting through to the copper. This picture is before cutting the connector off to feed the cables through the new lamp bracket. You can kind of see how the wires are sealed inside a plastic sheath. That sheath had to be split carefully with a utility knife along the entire length to get the wires out.
10) Here you are supposed to put this wire sheath on now that you have the bracket work finished. But, the wire sheath Harley gives you is HUGE, as in it could go over 15+ wires, and its not shrink tubing! Horrible. I went to Auto Zone and bought a roll of shrink fit tubing and covered them properly from the exposure point on the bracket all the way up to where I had to build the new connector.
11) Install passing light assembly on forks
12) Build the new connector. This means stripping the jacket off about 1/8" of the end of all 4 wires for each turn signal and passing lamp. Then your supposed to crimp the provided pins on the wire and snap them into the new connector. I soldered mine on instead to insure good contact. Then stick the pins in the correct positions in the new connector and reconnect to the feed in the fairing. This is where you get the power for the passing lamps. There is an extra grey wire on the feed connector that is originally unused which is now used for the passing lamps.
13) Try them out before finishing re-assembly.
14) Re-install front of fairing and windshield.
15) Wash the bike. (Why not right?)
The installation took 3 hours start to finish and that included my trip to Harley to find out about the power feed. Not bad for not having done it before. They look great and work great. It really shoots light out to the sides which is great for safety. On my morning commute to work which is always in the dark I can come up right beside a car and see the light from them lighting up the driver.


No comments:
Post a Comment